Sunday, June 27, 2021

Throwback photo LM#554

It's time for Lasting Memories fifth and last challenge of the month. For the month of June, LM is doing all about photos for inspiration challenges- This time, use a photo that is at least 10 years old.  If you don't have an old photo, create a layout using a selfie.  Since I just Chapereoned JCHS 2021 Prom I thought I'd dig out this gem from 1990. I used some older paper too as that is a requirement for the TSR challenge.(You must use at least one item on your page that has been in your stash for at least one year.)


I rotated the TSR throwback sketch and used "Scenic Route" clearance items from when Ben Franklin closed in Eugene.

This lovely picture of my date Robert and myself at my Junior Prom. Robert was kind enough to be my date as my boyfriend was taking college finals and I couldn't think of anyone else I would rather have spent the evening with other than my big, little brother. I would spend hours at Roberts's house talking with him about life and love.


I took all my cues from the sketch and tried my hand at some mixed media and stencils. I used white paint mixed with marigold shimmerz and then splattered with old yeller inklingz and radiant rain yellow. I fussy cut the flowers from the patterend paper and popped it up on foam. mixed in some red enamel dots and the orange gems with the gold foliage that matches the smile script I used for my title.

 And here a shot of me at the photo station for this year's Prom

Thanks for stopping by and make sure to check out lasting Memories


Thursday, June 24, 2021

Rendezous with S.I.T #474

 I'm on a roll again, just in time to go on a road trip.  We'll see how much crafty and creative time I get while traveling. In the meantime, I'm here to share another boy scout layout based on S.I.T sketch #474


I rotated the sketch to fit the orientation of my photos and I added an extra photo as I trimmed them down to edit out a random adult that was in the shot.


Fussy cut the stars from a patterned paper from the same collection as well as added some star stickers and nuvo drops.  Thanks for stopping by to take a look.


Tuesday, June 22, 2021

9/11 Flag ceremony with Scrap our Stash

  Just got back from my son's Court of  Honor last night and was feeling motivated to get this done.  I'm trying to get closer to current.  This one is 9/11/2019 but I am also working on photos from 2020. The sketch I used from Scrap our stash and added the wood veneer embellishments

I used Bella Blvd "Fireworks and Freedom" which has been in my stash for a while now.  I figured that even though the photos aren't from the 4th of July the patterned paper would go well with the patriotic theme of a flag ceremony.


 The wood veneer phrase arrow and hearts are leftovers from a kit that have also been languishing in my stash.
I love that Scrap our stash encourages diving into and using up our stash of materials.  I've been trying to use what I have and not buy more.  I was doing great till I went thrifting with my daughter.  Found some tags, gems, and dimensional phrase stickers at the local Goodwill.  $3 for new to me items that someone else donated.  I call that a win.


I used the die-cut star (light blue) and created my own stars by punching into the middle of a firework burst.  the tiny red star is the end of the burst.  I hid the cut by tucking it under the layers and added some sparkle with the rhinestone.


Thanks for stopping by to take a peak


Sunday, June 20, 2021

Tenderfoot Court of Honor with S.I.T #473


Happy Father's Day to those that celebrate.  I'm sneaking in some early morning crafting as my husband and son are at Camp Baker for an OA work weekend.  We'll celebrate with a nice dinner when they get home but what better way to mark the date than to create another boy scout layout using sketch #473


I switched it up a bit with labels and tags in place of flowers.

Thanks for stopping by

Black and White with LM

 I wasn't entirely sure which of my B&W photos I was going to use to create my GDT assignment for Lasting Memories.  I printed a variety of photos from my hiking adventures with Crystal and Tami.  I'm fortunate to have such amazing friends that share my passion for outdoor adventures. 

 Here's the companion page to my GDT page


I love the dimension in the Journal cluster and that I was able to work in some more wood veneer shapes.  I almost didn't use them as I only had the two flowers and wanted wood in each of my embellishment clusters. 


To solve the wood flower shortage I used my last heart and created a banner from a 2x2 card to bring more flowers to the cluster and make just a bit of the wood peak out from the background without being overwhelming


and here are the two pages together.  In case you missed the left-hand side of the spread you can find it here.


Thanks for stopping by and make sure to stop by Lasting Memories


Lasting memories #553 Black and white

  It's time for Lasting Memories fourth challenge of the month. For the month of June, LM is doing all about photos for inspiration challenges- This time, use a black and white photo.

I don't typically print in black and white and when I do it always tends to be in a larger format 5x7 or 8x10.  My photo of the Columbia River Gorge through the tree line at the top of Beacon Rock is just stunning in B&W ( so is the color version) whoever the selfie of myself and Tami is a hodgepodge of colors, so going B&W keeps the distraction at a minimum and lets the scenery shine.  All the color I need comes from the patterned paper and embellishments I used.

I'm so glad we got to get in this sunrise trip as the trail is now closed due to falling rocks.

Rocks took out the railing and damaged trees above and below.  This picture (from the Washington State Park post) doesn't do the trail justice as it is a series of switchbacks and stairs

This is one that I took on our way down when we actually had light


I was inspired by the color mood broad from LM #549


and Allison Davis sketch support #21


I started with the right-hand side of the layout with the pattern paper stripes then rotated the orientation and used an 8x10 focal photo instead of the group of smaller photos.  I printed my journal strips to get the maximum amount of info into a smaller space as I didn't want to cover too much of the focal photo.

Thanks for stopping by and make sure to check out Lasting memories


Thursday, June 17, 2021

Urban Orienteering

 I'm finally back to creating after the big move downstairs to the front foyer.  My youngest daughter finally got her wish of having her own room, so I gave up the guest room/ scrap space I acquired in January 2020 when the eldest daughter moved out.  My multi-photo layout is based on Stick it down double-page sketch.

I used more photos than the sketch called for as I had several I wanted to use to document my son's scouting adventure.  We did a family urban orienteering course that I put together to help him with his compass skills requirement for first class. Junction City, Oregon has some neat historical buildings and some amazing gardens to explore.  


I numbered the photos on the right-hand side of the layout and then have the key on the left-hand side below the journaling.

I have almost used up the last of my Creative Memories NSD 2019 papers and embellishments.  I even managed to work in the border from the make and take station at the NSD event.  I'm not much of a border maker kind of girl so this was huge, especially since it was pre-made.

Below are some photos of my new space by the front door


The shelf under my work table is the bottom half of a DVD rack that we altered in another household update.  Love that I could upcycle the piece and not spend much money on the new setup.  I scored with the garage sale find of the two bookcases for $30 and they are solid wood.   


The last share is my mid-month check-in for #2021goals.
I've only missed a few days, not too bad with summer track and a move

Thanks for stopping by and make sure to check out Stick it down as well as Lasting memories multi-photo challenge

Sunday, June 13, 2021

Shaped photos with lasting memories

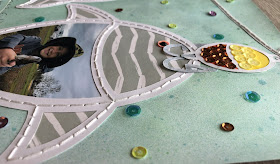
  It's time for Lasting Memories' third challenge of the month. For the month of June, LM is doing all about photos for inspiration challenges-Use at least one photo on your layout that's a shape other than a rectangle or square (i.e. circle, oval, triangle, hexagon). I’m still working my way through my son’s scout photos and thought it would be fun to do a thematic shape to document his fishing merit badge. I used this cute file from COAPA as the starting point 


and then cut larger plain fish on my circut to frame my photos. I altered the smaller one so that I could have Eric's fishing pole and part of the pond inside the fish.  I hide that I cut and flipped the arc by adding stitching to the fish outline.


I love the texture that the stitching and sequins add to the layout.  Almost like fish scales but not on the fish.
I stretched the cut file so the bobbers would be larger but it did distort the shape a little.  Same with the fish.

I've included some of the close-up shots so you can see the added detail of the sequins and sticthing.

The last little touch was added to the journal lines.  The white didn't show up well so I went over it with a few strokes of gold gel pen.


The entire background for the layout was created with shimerz sprays.

Thanks for stopping by and make sure to check out the challenge at lasting memories


Sunday, June 6, 2021

LM #551 Frame your photo


 It's time for Lasting Memories' second challenge of the month. For the month of June, LM is doing all about photos for inspiration challenges- This time Frame your photo.

I went with the literal frame with a twist.  I had two sets of die-punched frames stars and buttons that I have had in my stash forever, so I stacked the middle section of the frames one on top of the other so that the middle portion would have the same width of the border as the top/ bottom and sides of the frame.   Then I stitched a frame just inside of the outer edge of the frame to give it the look of a single frame.  I placed the stars and buttons to camouflage the joints.

Frame close up

Stitching detail on the stars and buttons.  The thread makes the button look real with the added dimension.

Thanks for stopping by and make sure to check out Lasting Memories #551 frame your photo